Wednesday, May 30, 2012

Pave the Way!


Our New Paver Stone Pathway
Area Before


Area with the new paver pathway to the gate.
 Our house's landscaping has been largely ignored since we moved in.  Our main focus over the past two years has been on interior renovations, but the call of the wild could be ignored no longer.  John decided to create a path from the deck off the garage to the fence gate in our back yard.  The first step was to dig out the ground deep enough for the pavers, stone base, and sand.  This was a very labor intensive task that John completed in a couple of hours last Wednesday.  After digging everything out it was time to purchase our paver stones.  We ended up with the "countryside" collection by Lowes.  We were fortunate to find that Lowe's had all their paver stones on sale this past Memorial Day weekend. 

Laying the Paver Base and Edging
Outling the pathway with border pavers. 

After all the digging was done, John used a compressor to compact the area.  A layer of paver stone and sand were laid down prior to placing the stones.Once the paver pattern was established it was just a matter of laying down the paver stones and making the edge cuts as necessary. Once all of the pavers were laid, John installed a paver sand cement.  This product is a good way to hold the pavers in place.  A little retaining wall, a few zinnias/marigolds and presto chango the backyard is starting to shape up.


Laying our the design.

Saturday, May 26, 2012

Pretty Peas


I am continuously being amazed at how quickly vegetables can grow.  We had plenty of rain and sunshine last week.  This morning I was happy to see that the sugar snap peas have sprouted their pods. Just a coulple of days ago there were just little white flowers and now we have 2 inch long pods.  I don't think these are quite ready to harvest.  I plan to wait until the peas are a bit fuller before I pick them.  At this rate it shouldn't be too much longer.

Friday, May 25, 2012

It All Comes Out in the Wash!


The very first renovation project at our current house was to update the laundry.  I'd never had a laundry room before, so I felt lucky just to have a space dedicated for this purpose.  The bad thing about our laundry room was the pink wall paper, vinyl floor, and laundry sink (straight out of a scary movie).
Yucky Vinyl_ Wall Paper had just been stripped in this photo.

Scary Movie Laundry Sink!

Old Pink Wallpaper and Hot Water Tank


 The first thing to go was the wall paper.  My husband soaked the paper down with a water bottle and diligently scraped it away.  The walls were then primed with "Killz" and then we painted.  The paint color is "Silvermist" by Sherwin Williams'.  I thought this color would be nice and serene for a laundry.  The second major undertaking was the floor.  Despite having a one month old baby, my husband ambitiously took on the task of replacing the vinyl with a porcelain tile.  The hot water tank was replaced with a tank less system which really opened up the floor space in this room.The other big project in the room was the cabinetry which my husband made from scratch.  This was his first cabinet making experience and I think he even surprised himself with how well it turned out.  He made a custom shelf next to the new laundry sink for me to slide my laundry baskets on.  I actually get two baskets in this space.  One on the shelf and one on the floor.  I made a simple curtain for the shelves to hide the baskets yet keep them easy to grab. 


Recently I added the pin board to the wall above the sink (Pinterest inspired).  I just used a regular cork board that my sister generously gave me a while back for another room.  I put leftover craft paint on the frame and then I painted stripes directly on the cork.  I used a DVD case, good ole "O Brother Where Art Thou", as a simple and easy way to measure the width of my stripes. I just slid the DVD case up and down the frame to mark my lines.  I used painter's blue tape to keep me neat!  This simple addition to the room has given me a spot to pin photos, a calendar, and all of those invitations/service reminders that seem to get stacked up in piles everywhere. This is our main entry/exit for the house, so this is a good spot to post reminders on the chalkboard plaques that my husband put on the door leading to the garage.  He simply painted some scrap boards with chalkboard paint and adhered them to the metal door with "Liquid Nails" (great stuff).

Below are the photos from making my custom pin board.
Plan Tack Board

Craft Paint


Marking the Lines


Jar is for collecting all those items left in your pockets.  I just wrote on the glass w/ chalk.


This whale is a freebie sticker from Gap Kids.  I finally found a use for it, yipee.


I still need a rug for this space.  I will post and update when I find the right one.

Wednesday, May 23, 2012

Going Green


Romaine Lettuce (No pesticides were used.)
Well, I am super thrilled to harvest more veggies from my very first garden.  This time, I clipped some Romaine Lettuce.  I read online that you can continuously harvest lettuce if you only clip the outer leaves and leave the center alone.  According to various Internet sources, the center will continue to grow and expand outwards.  I will post an update on how well this works.  I used the lettuce for a side salad at dinner and it was delicious.  I have never had lettuce this fresh before and you can't ignore the amazing crispness.

In more harvest news, I have pulled some more radishes.  The one pictured above was huge.  John put the apple next to it for comparison of size.  The cutting board in the picture is another talent of hubby's.  A couple of years ago he made several cutting boards.  This is one of my favorites.  It is made from maple, yellow heart, and walnut wood.

Friday, May 18, 2012

What to Expect when you are Expecting & Renovating your Kitchen, Part I


Renovations are always a lot of work.  Throw in an short time frame and they tend to be somewhat stressful.  Throw in a 10 month old baby, a total kitchen gut/renovation, baby #2 on its way in less than four months, and you have our crazy "Dream Home Kitchen Renovation". 
My Dream Kitchen, Finished Just In Time!

When we purchased our house we knew we would like to renovate our kitchen down the road.  We moved into our house when our first child was just 3 moths old.  I didn't expect us to renovate the kitchen for a couple of years (you know being new parents and all) but one project led to another and seven months later we were in full blown kitchen renovation. 


Kitchen/Family Room_Before 

Kitchen_Before (Only good thing was the stove)

To explain, our first improvement to our new house was to remove the two hot water tanks (one upstairs/one downstairs) and replace them with a single tank less "Rinnai" hot water heater.  The two existing hot water tanks served different areas of the house and the plumbing needed to be looped  together to convert to just one "Rinnai" tank less heater.  This meant tearing out the ceiling in our family room/kitchen area. 
One of the old hot water heaters.

Once the ceiling was torn out, we thought it would be the best time to add some overhead pot lighting.  The family room only had one low hanging ceiling fan/light combo and there was a big fluorescent box in the kitchen.  Once the new lighting was in we were ready to patch the ceiling......well not actually. So much of the ceiling had to be torn out for the plumbing work and new lights, that it made sense to just replace the ceiling rather than patch.  Also, the old ceiling had a popcorn texture and we prefer a smooth finish.  My husband set about demolishing all of the ceiling in the family room.  It then became obvious that in order to replace the ceiling properly, we needed to take down the ceiling mounted cabinets and bulkhead that separated the kitchen from the family room.  Once we were in it this far my husband bravely decided to just go ahead and renovate the whole kitchen.  I can truly say he was brave, because I was a little less than four months away from delivering our second child.   Anyone who has ever had a baby knows that having a working kitchen is really good when you bring that new baby home, i.e. bottles to sterilize. 

We hadn't drawn out the plans for our new kitchen yet (we weren't really planning to do it yet), so as my husband tore out the existing cabinets I got to work drafting out the new layout.   Luckily my husband and I were on the same page for the new kitchen design and we were quickly able to send out the layout for cabinet quotes.  We got several quotes from various vendors/manufacturers and landed on "Mid-Continent Cabinetry".  We ordered all plywood construction cabinets with dovetail drawers, slow-close hardware,  and glazed finishes for an amazing price through our local "Builder's First Source".  My husband saved us over $1,300 by installing the cabinets himself.  Cabinet installation is a lot of hard work and not easy, but he did an amazing job. Being really pregnant, my job was to help figure out the maze of cabinet boxes that were delivered to our garage, i.e. what piece goes where.  We ordered low maintenance quartz-counter tops which was our splurge on this project, but all in all our total expense was super reasonable.


Nothing better than a big pantry cabinet..this has pull out shelves to make it easy to reach everything.

We planned for a nice stainless steel refrigerator, but for now the black economy version is working fine..  Our kids love their refrigerator farm (taken down for picture) and this toy would scratch stainless.

Loving all of the cabinet storage.

Pot depth drawers next to the stove are a must!

Bottom drawer of the island is toy storage.  Our kids love to pull the toys out and this keeps them in reach but out of sight.


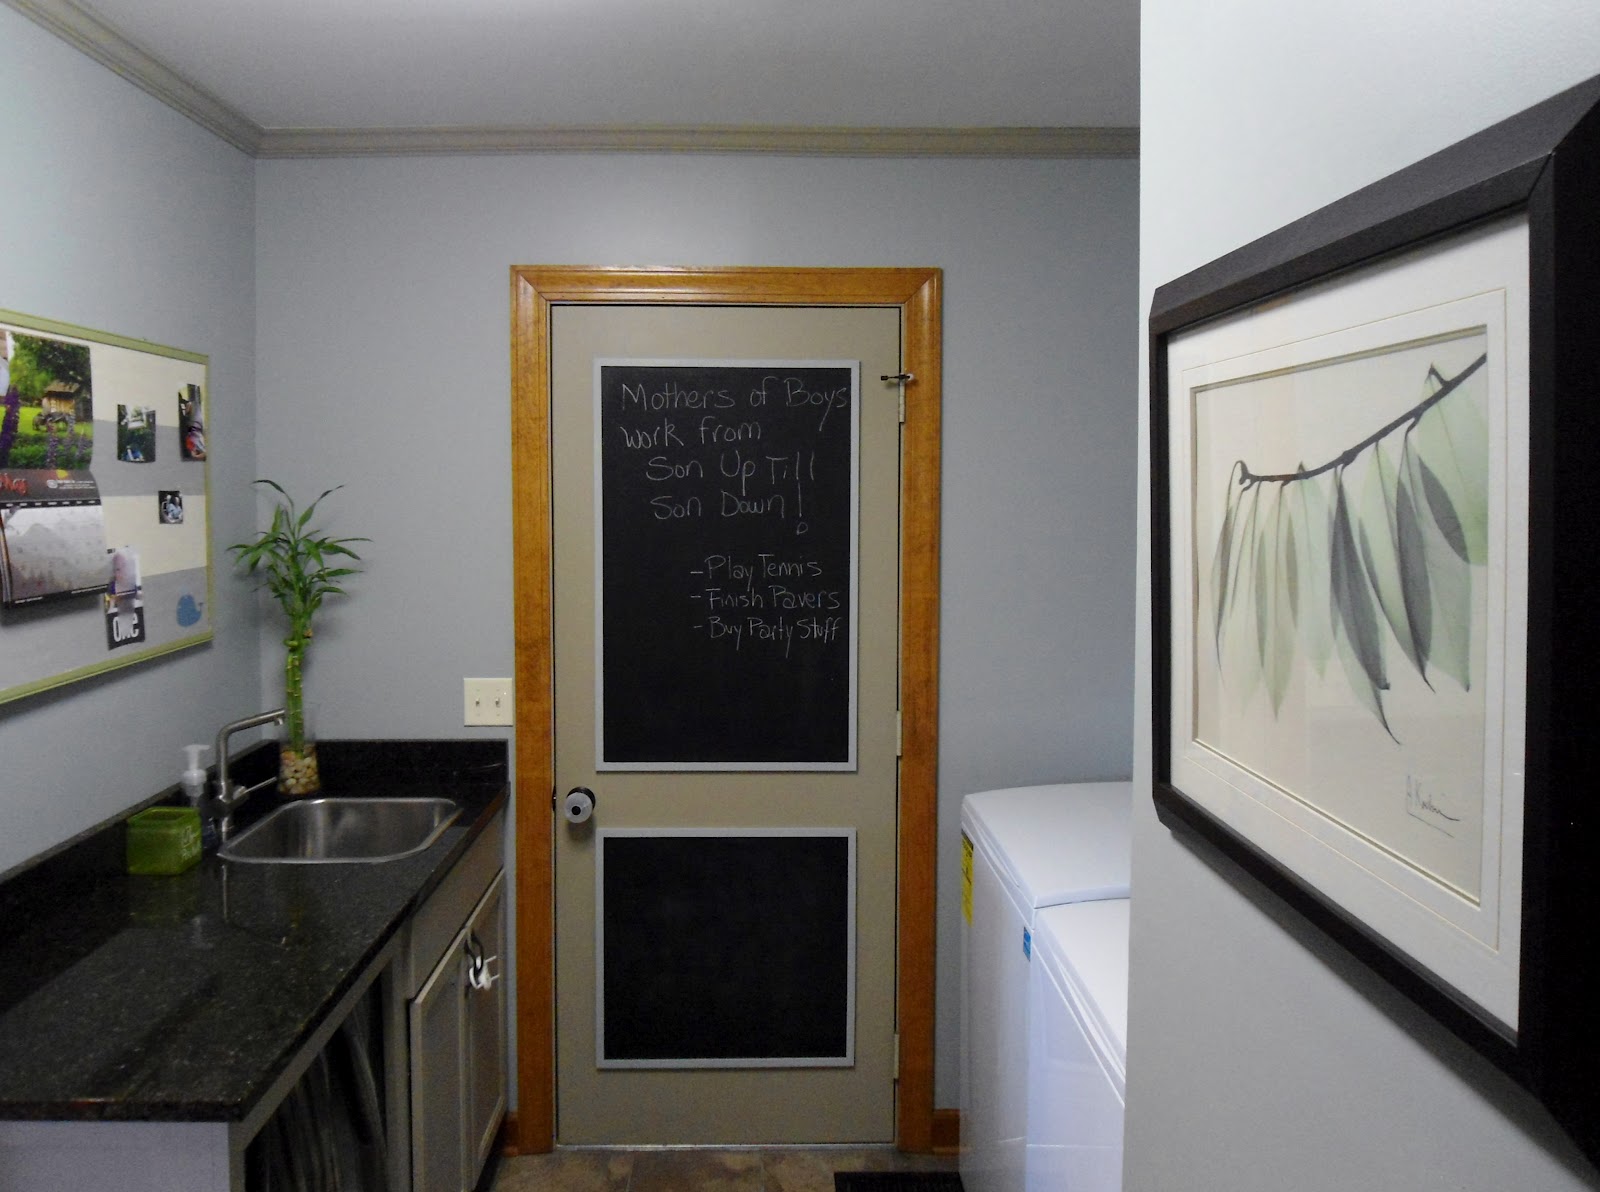
This is my one picture in the kitchen (with all of my cabinets, there isn't a lot of wall space).
.  It helps me on extra stressful days!
With just a little over a week till the due date the kitchen was up and running (working sink and dishwasher...yeah).  We actually finished the backsplash tile up the week we brought our youngest son home.  Needless to say, my husband was my hero for finishing this project in such a short time and doing such a great job!

For me, the biggest improvement in this renovation was the removal of the ceiling mounted cabinets and peninsula.  Having an open sight line to the windows and family room makes the space feel ten times larger.  This also helps me keep a better eye on what the kids are doing.  Having a more open path of circulation makes cooking a breeze.  I just pop food out of the fridge, three steps to the sink, two steps to the stove/microwave, and then two steps back to the dishwasher.  I love the new convenience the layout provides.


In my next post on the kitchen renovation, I will detail all of the sources for our materials.


Wednesday, May 16, 2012

Artwork Update for Main Floor Bathroom


As mentioned in my previous post on our main floor bathroom renovation, I have been searching for some insect art to put on the walls.  It turns out, I didn't have to look far.  I found these beautiful hand drawn/painted butterfly prints that a good friend made for me several years ago.  The pictures had been buried in a closet from our move two years ago.  My friend is a wonderful artist and I am glad to find a place for these to hang in our new house.  The butterfly art was given to me with some beautiful handmade frames, but they didn't have any glass in them.  Because the bathroom will have moisture, I wanted to re-frame them with glass for protection. I found some buy one get one frames at Michael's and I think they really compliment my friends work.  I might still add another piece of insect art to another wall in this room, but for now I am happy with the update.  It is really fortunate to be blessed with such talented friends.

Prints in Original Handmade Frames/Mat

Tuesday, May 15, 2012

Our First Harvest from the Garden

Wow, I couldn't be more excited.  This morning my oldest son and I went outside to check on the garden.  We have been blessed with a lot of rain and everything is growing really fast!  To my delight there were several red balls popping out of the dirt:  yeah, we have radishes!

My First Harvest from My First Garden!

Radishes before they were washed.

Garden 4-12-2012 (Look How Big the Tomatos and Romaine Lettuce are Getting)
Everything is growing really well except my cucumbers which are lagging behind.  I planted some cucumbers from seed and I also bought a plant.  They don't seem to be growing much at all.  If they don't take off soon, I may try buying another plant.  I really love cucumbers.

Monday, May 14, 2012

All Hands on Deck

The previous owner of our house put a new deck on the back to help aid in the selling process.  The deck is very well constructed and is made from pressure treated wood.  We have lived in the house for two years this June and we guess that the deck is probably about 2-1/2 - 3 three years old.  It had never been stained and was starting to shows signs of drying out from a couple years of direct sun exposure. This side of the house faces south and gets direct sun exposure for over 8 hours a day.


All of the above said, this was the weekend to stain the deck.  My husband has been researching the proper way to clean and stain a deck for several weeks.  He read reviews on all of the different brands and types.  We ended up using "Cabot Australian Oil' from Lowes.  We went with the natural finish, just because this was our preference.  The work started on Saturday.  First he scrubbed down the deck with water and a hard bristle brush.  Next he used "Cabot's" wood brightener.  The brightener helps bring back the warm tone of the wood.  John sprayed on the brightener with a pump sprayer.


Once the deck was cleaned it was time to stain.  John used a sponge applicator for the floor boards and a brush for the railing.  It takes 24 hours for the stain to dry.  Luckily rain held off just long enough for the stain to get good and dry.  We still have some railing to finish, but so far we are very happy.  The rain we received on Sunday showed us that the sealer is working good. The decking is no longer soaking up the rain:  the water is beading up nicely on the boards.

Post Staining....Water Beading..YEAH!


If you look at the railing you can see the unsealed section on the right.  

So far, we are really pleased with the natural finish stain.  It just warmed up the wood without turning it too golden a color.  I will update the ongoing performance of the stain in future posts.

Future Deck Upgrades:

Outdoor Seating/Furniture
Put potted plants back
Grill?